Most home recordings fail because engineers treat drum miking like placing decorations rather than capturing acoustic energy in three-dimensional space.
Recording drums represents the most complex miking challenge in audio engineering. Multiple sound sources generate overlapping frequencies across different dynamic ranges while cymbals bleed into tom mics and room reflections colour every channel. Success depends on understanding how each microphone relates to the complete sonic picture rather than isolated drum sounds.
This guide covers microphone selection, placement techniques, phase relationships, and signal chain optimisation for home studio drum recording. We examine close miking strategies, overhead positioning, room mic integration, and common routing mistakes that compromise otherwise solid performances.
Essential Microphone Types and Placement
Dynamic microphones handle the high sound pressure levels drums generate while providing natural rejection of off-axis sources. The Shure SM57 remains the standard snare drum choice because its presence boost enhances crack while the cardioid pattern minimises hi-hat bleed. Position it roughly two inches above the rim, angled toward the centre at approximately 45 degrees. This angle captures both fundamental tone and harmonic snap whilst avoiding direct cymbal wash.
Kick drums require dedicated large-diaphragm dynamics like the AKG D112 or Electro-Voice RE20. Place the microphone inside the drum roughly six inches from the beater head, slightly off-centre to avoid direct attack impact. Some engineers prefer boundary microphones like the AKG C414 placed against the resonant head for extended low-frequency response. The Audio-Technica ATM25 offers another excellent option with its hypercardioid pattern providing superior rejection of stage bleed.
Tom miking follows similar principles to snare placement but requires consideration of pitch relationships. Dynamic mics like the Sennheiser MD421 work brilliantly on rack toms, positioned above each drum at similar angles to the snare approach. Floor toms benefit from the same microphone positioned closer to capture the fundamental frequencies that give these drums their weight and presence in the mix.
Overhead Microphone Strategies
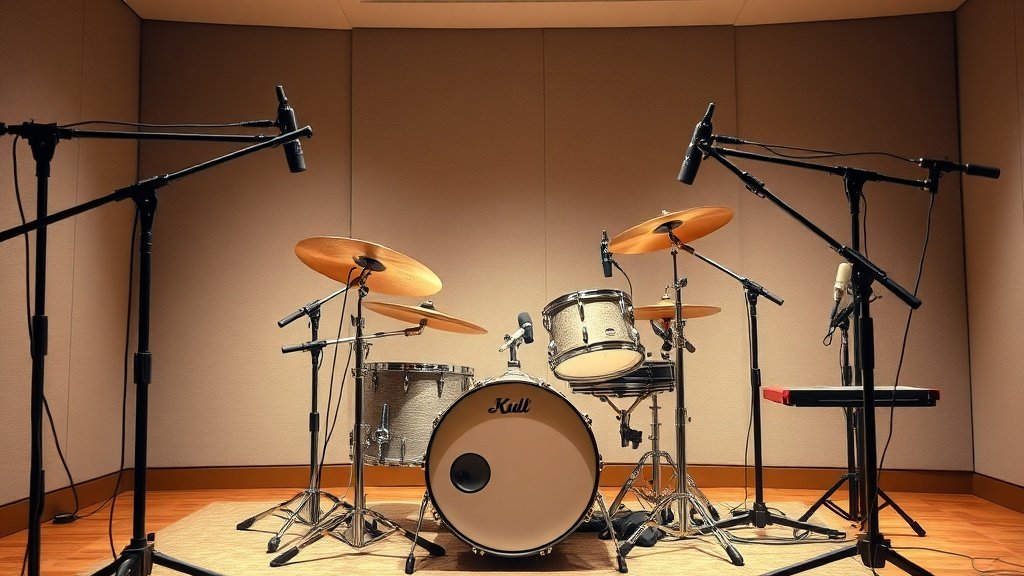
Overhead microphones capture the complete kit perspective and provide the stereo image that makes drum recordings feel spacious and natural. Condenser microphones excel here because their extended frequency response preserves cymbal detail and transient clarity. The AKG C414 pair offers exceptional results when positioned roughly four feet above the kit in an XY configuration, with capsules angled outward to create stereo width whilst maintaining mono compatibility.
Spaced pair techniques work well in acoustically treated rooms where reflections enhance rather than muddy the sound. Position matched condensers like Rode NT5s equidistant from the snare drum, typically three to four feet above cymbals. This approach creates wider stereo imaging but requires careful attention to phase relationships between left and right channels. Always check mono compatibility by summing both overhead channels and listening for frequency cancellations that indicate phase issues.
Distance affects both tone and room integration. Closer positioning emphasises direct drum sounds with minimal room character, whilst greater distances incorporate more ambient reflections. Most home studios benefit from closer overhead placement due to acoustic treatment limitations, but experiment with distance to find the balance between clarity and natural reverb that suits your room and musical style.
The relationship between microphones matters more than individual microphone quality when recording drums successfully.
Phase Relationships and Channel Alignment
Multiple microphones capturing the same sound sources create phase interactions that either reinforce or cancel specific frequencies. When overhead mics are equidistant from the snare drum, both channels receive the snare signal simultaneously, creating reinforcement when combined. Unequal distances cause one channel to receive the signal slightly later, resulting in phase cancellation that hollows out the snare sound and weakens the overall mix.
Time alignment becomes critical when combining close mics with overheads. The snare close mic captures the drum immediately whilst overhead mics receive the same sound several milliseconds later due to increased distance. This delay causes comb filtering that creates unpredictable frequency response changes across the spectrum. Most digital audio workstations include delay compensation tools that allow precise timing adjustments to align all channels properly.
Test phase relationships by soloing the snare close mic with one overhead channel, then adding the second overhead whilst listening for frequency changes. Properly aligned signals reinforce each other and sound fuller when combined. Misaligned signals create hollow, weak combinations that lack impact and presence. Use delay adjustment rather than polarity reversal to solve timing issues, as polarity changes affect the entire frequency spectrum whilst delay adjustment targets specific timing relationships.
Signal Chain and Gain Structure
Proper gain structure prevents distortion whilst maintaining adequate signal-to-noise ratios across all channels. Drums generate enormous dynamic range from ghost snare hits to full-power crash cymbals, requiring preamps that handle transient peaks without compression or clipping. Audio interfaces like the Focusrite Clarett series provide clean preamps with sufficient headroom for drum recording, whilst units like the PreSonus Studio 1824c offer the multiple inputs essential for complete kit capture.
Set input gains conservatively, allowing peaks to reach roughly -12dBFS maximum to prevent digital clipping during unexpected loud hits. Kick drums and snare hits represent the highest level sources, so establish gain structure based on these elements before adjusting other channels. Overhead mics typically require more gain than close mics due to increased distance, but be cautious of noise floor elevation when boosting preamp levels significantly.
Consider using external preamps for critical channels when built-in interface preamps lack character or headroom. The Warm Audio WA273 provides vintage-style colour that enhances drum tones, whilst clean preamps like those in the RME UCX II maintain transparency for post-processing flexibility. Match preamp character to musical style and mixing approach rather than automatically choosing the most expensive option available.
Room Acoustics and Ambient Miking
Room acoustics dramatically affect drum recordings, with reflections either enhancing natural reverb or creating muddy, unfocused sounds. Most home studios benefit from moderate acoustic treatment that controls excessive reflections whilst preserving some natural ambience. Absorption panels placed at first reflection points reduce unwanted echoes without creating completely dead spaces that sound unnatural and lifeless.
Ambient microphones capture room reflections intentionally, adding space and dimension to close-miked drum sounds. Position condenser mics like the Audio-Technica AT2020 roughly eight to twelve feet from the kit to capture room reverb without excessive direct sound. Compress these ambient channels moderately during mixing to control dynamic range whilst preserving the natural decay characteristics that make rooms sound believable.
Experiment with ambient mic placement throughout the room to find sweet spots where reflections enhance rather than compete with direct drum sounds. Corner placement often provides interesting low-frequency buildup, whilst midroom positions capture balanced reflections from multiple surfaces. Always monitor ambient channels in context with close mics rather than in isolation, as their contribution becomes apparent only when combined with the complete drum mix.
Placing microphones too close to drums creates an unnatural, isolated sound that lacks musical context. Maintain adequate distance to capture both direct sound and natural room reflections that give drums their characteristic size and presence in recordings.
Ignoring phase relationships between multiple microphones results in hollow, weak drum sounds. Always check that overhead mics are equidistant from the snare drum and use time alignment tools to synchronise close mics with ambient captures for maximum reinforcement.
Setting input gains too high causes digital clipping that destroys transient detail. Leave substantial headroom for unexpected peaks and use conservative gain settings that preserve dynamic range throughout the strongest drum hits and cymbal crashes.
Conclusion
Successful drum recording requires systematic microphone placement, careful attention to phase relationships, and proper gain structure throughout the signal chain. Focus on capturing the complete kit as a musical instrument rather than isolated drum sounds, using room acoustics and ambient miking to create natural space and dimension that serves the music.

FREE DOWNLOAD
Stop Guessing. Start Buying Smart.
The specs that actually matter, demystified.
Headphones, microphones, the spec sheet jargon you can ignore — all in one quick-reference PDF. Free, instant, no fluff.
Send Me the CheatsheetYou'll also receive occasional new guide notifications. Unsubscribe anytime. No spam, ever.