Most home studios sound terrible not because of bad gear, but because untreated rooms turn great monitors into misleading liars that mask mix problems.
After fifteen years mixing in everything from world-class studios to bedroom setups, the single biggest factor separating professional results from amateur recordings is room treatment. A pair of Yamaha HS8 monitors in a properly treated room will give you more accurate monitoring than Genelec 8351s in a bare concrete box.
This guide covers the essential acoustic treatment types, where to place them for maximum impact, and how to build effective room treatment on realistic budgets. We will examine absorption, diffusion, bass trapping, and the specific products that deliver measurable improvements in your monitoring environment.
Understanding Absorption and Reflection
Sound waves bounce off hard surfaces and create reflections that reach your ears milliseconds after the direct sound from your speakers. These early reflections confuse your brain about stereo imaging, frequency response, and spatial information. The solution is strategic absorption at reflection points using materials designed to convert sound energy into heat.
Acoustic foam panels like Auralex Studiofoam work well for mid and high frequencies above 500Hz. Mount 2-inch thick panels at first reflection points – the spots on your side walls where sound from each monitor first bounces before reaching your listening position. A simple mirror test reveals these locations: sit at your monitoring position and have someone slide a mirror along the wall until you can see each speaker.
Rockwool-based panels such as Primacoustic Broadway panels provide broader frequency absorption down to 250Hz. These rigid fibreglass panels handle more of the problematic mid-bass frequencies that foam cannot touch. Mount them in wooden frames with fabric covers for a professional appearance and better performance than basic foam.
Controlling Bass with Strategic Trapping
Low frequencies below 200Hz behave differently than higher frequencies, building up in room corners and creating uneven bass response that makes some notes disappear while others boom excessively. Bass traps placed in room corners address these modal problems by absorbing energy where it concentrates most.
Corner-mounted triangular bass traps like the Primacoustic MaxTrap provide significant low-frequency control without consuming excessive floor space. These thick rockwool assemblies work best when spanning floor to ceiling in at least two corners behind your monitoring position. The thicker the trap, the lower the effective frequency range – 4-inch depth handles frequencies down to 125Hz, while 8-inch traps work down to 80Hz.
Superchunk bass traps built from rockwool or fibreglass insulation offer professional results at DIY prices. Cut triangular sections from 4-inch rigid fibreglass boards and stack them in corners, then cover with acoustically transparent fabric. This approach costs roughly one-third the price of commercial bass traps while providing equivalent performance.
The difference between a treated and untreated room is not subtle – it transforms monitoring from guesswork into reliable decision-making.
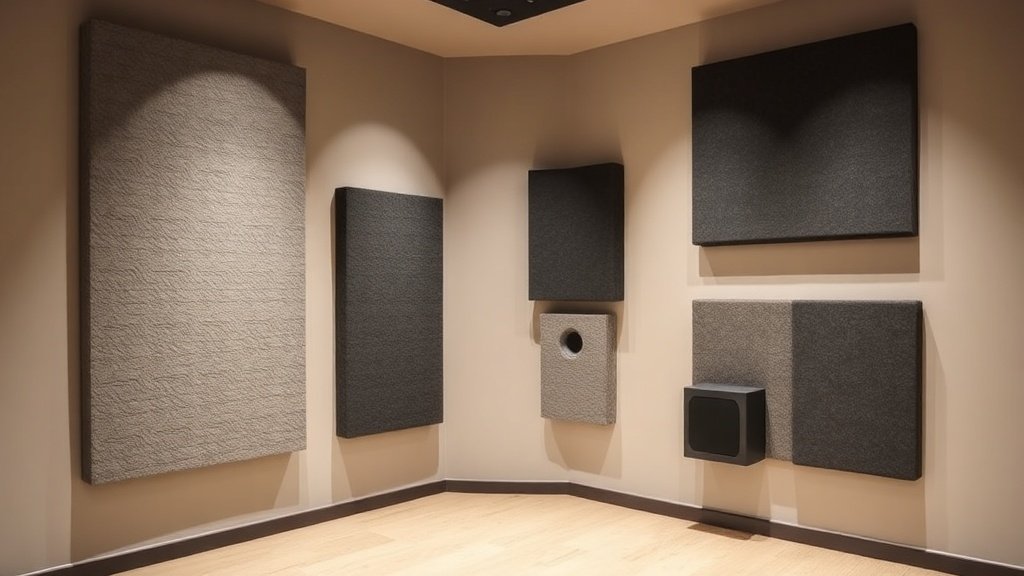
Placement Strategy for Maximum Impact
Effective room treatment targets specific problem areas rather than covering every available wall surface. Start with first reflection points on the side walls, then address the ceiling reflection point directly above your head at the monitoring position. These early reflections cause the most significant imaging and frequency response problems.
The rear wall behind your listening position benefits from a combination of absorption and diffusion. If the wall is close – within three feet – use absorption to prevent strong reflections. For walls further than four feet, diffusion elements like Auralex T-Fusor panels scatter reflections to create a more spacious sound without removing energy from the room completely.
Avoid over-treating the room by covering more than 30 percent of wall surfaces with absorption. Excessive absorption creates a dead, lifeless sound that makes it difficult to judge reverb, delay, and other spatial effects accurately. Balance absorption with some reflective surfaces to maintain the natural character of your room while controlling problematic reflections.
Budget-Conscious Treatment Solutions
Professional acoustic treatment costs thousands, but effective DIY solutions deliver similar results for hundreds. Rigid fibreglass insulation boards like Owens Corning 703 provide excellent absorption when wrapped in acoustically transparent fabric and mounted in simple wooden frames. These panels cost roughly 20 pounds each to build versus 80 pounds for equivalent commercial panels.
Moving blankets draped strategically during mixing sessions provide temporary absorption for problem reflections. While not permanent solutions, quality blankets like the Sure-Max 12-pound moving blankets can tame harsh reflections during critical listening sessions. Hang them from ceiling-mounted tracks or temporary stands positioned at reflection points.
Bookshelves filled with books create natural diffusion while serving practical purposes. The varying depths and sizes of book spines break up reflections effectively, though this approach works best on walls behind the listening position rather than at first reflection points where pure absorption is more beneficial.
Measuring and Fine-Tuning Results
Room measurement software like Room EQ Wizard paired with a calibrated measurement microphone such as the MiniDSP UMIK-1 reveals the actual impact of acoustic treatment on your monitoring environment. Take measurements before and after installing treatment to verify improvements in frequency response and decay times.
Focus on achieving reasonably flat frequency response within plus or minus 6dB from 40Hz to 16kHz at your listening position. Perfect flatness is impossible in small rooms, but reducing the largest peaks and nulls dramatically improves monitoring accuracy. Pay particular attention to the 80-300Hz region where room modes cause the most significant problems in typical home studios.
RT60 measurements show how quickly sound decays in your room across different frequency ranges. Target decay times between 0.3 and 0.5 seconds for optimal monitoring in small rooms. Longer decay times indicate insufficient absorption, while shorter times suggest over-treatment that removes too much acoustic energy from the space.
Covering walls randomly with foam panels does not constitute effective acoustic treatment. This scattershot approach wastes money and often makes monitoring worse by creating uneven absorption patterns that colour the sound unpredictably.
Egg crates and household materials do not provide meaningful acoustic control. These items might reduce some high frequencies but do nothing for the problematic low and mid frequencies that cause most monitoring issues in small rooms.
Ignoring bass trapping while focusing solely on wall-mounted panels leaves the biggest problems untreated. Low frequency modal issues dominate small room acoustics and require specific corner-mounted solutions to address effectively.
Conclusion
Effective room treatment transforms any monitoring environment more dramatically than upgrading speakers or other gear. Focus on first reflection points, corner bass trapping, and strategic rear wall treatment for maximum impact. Measure the results to verify improvements and guide further treatment decisions.

FREE DOWNLOAD
Stop Guessing. Start Buying Smart.
The specs that actually matter, demystified.
Headphones, microphones, the spec sheet jargon you can ignore — all in one quick-reference PDF. Free, instant, no fluff.
Send Me the CheatsheetYou'll also receive occasional new guide notifications. Unsubscribe anytime. No spam, ever.