The kick drum sits at the physical and sonic foundation of almost every recorded track, and where you place the microphone determines whether that foundation feels solid or hollow, present or distant.
Recording a kick drum is not simply a matter of pointing a large-diaphragm dynamic at a drum and pressing record. The kick drum is a complex acoustic instrument that produces low-frequency weight, transient attack, and beater click simultaneously, and these elements do not all radiate from the same point. Position your microphone in the wrong location and you will capture one characteristic at the expense of another. Get it right and the kick drum locks the entire mix together before you have touched a compressor.
This guide covers the three principal miking approaches: inside the shell, outside the front head, and using two microphones in combination. For each approach I will explain the acoustic reasoning, describe specific placements that work reliably in professional sessions, name microphones that are well suited to the role, and address the phase considerations that become critical when you move to a dual-mic setup. Whether you are tracking in a purpose-built live room or a modest home setup, the principles are identical.
Understanding What the Kick Drum Actually Radiates
Before placing any microphone, it helps to understand what you are chasing. The beater impact produces a sharp transient click that is richest in the upper midrange, roughly between 2 kHz and 5 kHz, which is what gives a kick drum its sense of definition and presence in a dense mix. The fundamental body of the drum, the low boom that you feel as much as hear, sits much lower, typically between 50 Hz and 100 Hz, and it radiates outward from the front head and the shell itself. The sub-bass content, the weight below 60 Hz, tends to develop more fully at a distance from the drum because low frequencies require space to fully form their wave cycles.
This acoustic reality is why no single placement captures everything with equal clarity. An inside position rewards you with proximity to the beater, giving you enormous click and attack, but the low-frequency wave has not yet had space to develop. An outside position at some distance from the front head picks up a fuller, more rounded low end but may lack the transient sharpness the inside position delivers. The dual-mic approach attempts to capture both and blend them in the mix, which is why so many professional sessions default to it once time and microphone availability allow.
Miking the Kick Drum from Inside the Shell
For inside miking you need a port hole in the front resonant head, or the front head removed entirely. Most studio kick drums already have a port hole cut off-centre; if the drum you are recording does not have one, the drummer or studio will need to address that before you proceed. With access to the interior, you position the microphone inside the shell on a small boom stand, typically angled toward the beater impact point on the batter head. The standard starting position is roughly 2 to 4 inches behind the batter head and aimed slightly off-axis from the direct centre of the beater strike. Direct centre gives you maximum click but can sound harsh; a few degrees off-axis softens that harshness without losing the transient character.
The Shure Beta 52A is the most widely used microphone for this placement and with good reason. It is a supercardioid dynamic designed specifically for kick drums, with a frequency response that has a significant presence boost around 4 kHz to emphasise beater attack and a extended low-frequency response that handles the physical air pressure inside the shell without distortion. The AKG D112 MkII is another standard choice, characterised by a pronounced hump around 100 Hz that adds body to thinner-sounding kick drums. The Audix D6 takes a different approach, with a sharper presence peak and a tighter low-end character that works well for genres where a punchy, defined kick is preferred over a rounder, more vintage sound.
Moving the microphone further from the batter head, toward the centre of the shell or even near the port hole, reduces click and increases the proportion of low-end body in the capture. This can be useful if the drummer plays with a very hard beater and the raw track would otherwise be overly aggressive. Experiment with small incremental moves; a difference of two inches in position can produce a meaningfully different tonal result.
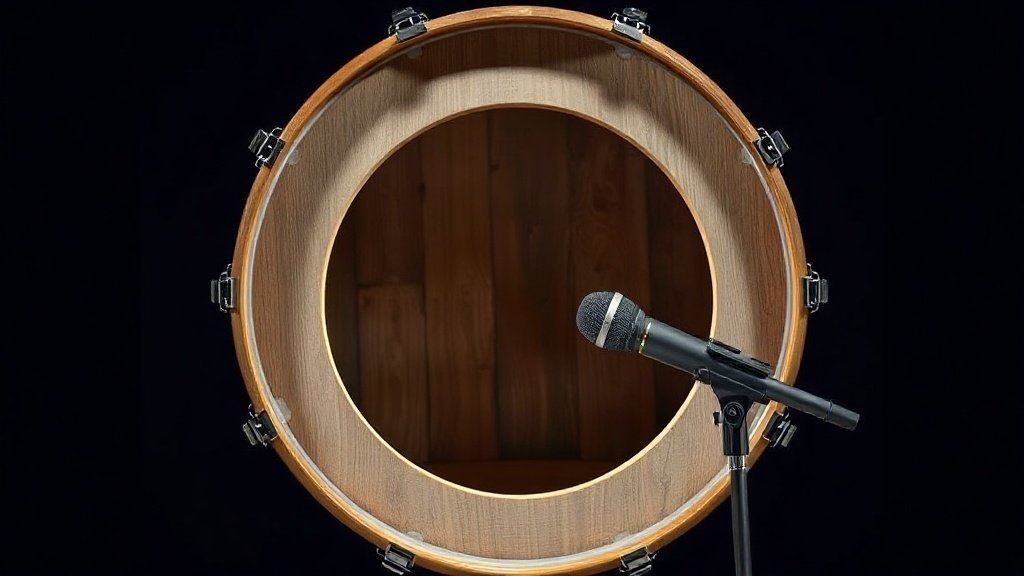
Miking the Kick Drum from Outside the Front Head
The outside position involves placing a microphone in front of the resonant head, either directly in front of the port hole or out to the side of it, at varying distances from the shell. This approach captures the drum in a way that is closer to how it sounds in the room, with the low-frequency content more fully developed and a rounder, more enveloping quality. It is the preferred approach for engineers who want a vintage, warm kick drum character, particularly in jazz, blues, or acoustic music where the beater click would be intrusive.
For this placement you can use a large-diaphragm condenser microphone if the sound pressure level is manageable, which with most kick drums it is at distances of 12 inches or more. A microphone such as the Neumann U 47 FET, in studios where one is available, produces an exceptionally rich low-end capture from the outside position. In more practical terms, the Sennheiser e902 is built specifically for this role and performs well just in front of the port hole. The Yamaha Subkick, which is a speaker cone mounted in a drum shell, operates on entirely different principles and picks up only the very lowest frequency content; used as an outside microphone blended with an inside track, it adds a subsonic weight that few conventional microphones can match.
Distance from the head has a significant effect. At 6 inches the sound is tight and defined. At 18 inches it becomes rounder and the room starts to contribute. At distances beyond 2 feet the room acoustic becomes a meaningful part of the capture, which can work in a well-treated live room but tends to cause problems in smaller or less controlled spaces. Start at 6 to 12 inches and move outward from there based on what you hear.
The kick drum is the only instrument in a standard drum kit that will make or break the entire low end of a mix based on where you put a single microphone.
Running Two Microphones: Combining Inside and Outside
The dual-mic approach gives you creative flexibility that a single position cannot. You record the inside microphone for its beater attack and keep the outside microphone for its low-end weight and body, then blend the two faders in the mix to taste. This is common practice on professional sessions across virtually every genre from heavy rock to modern pop production. The inside track is often pushed higher in the blend for rock and metal, where the attack cut is essential. The outside track may dominate in more bass-forward contemporary production where sub-weight matters more than click.
The critical issue when running two microphones on a kick drum is phase alignment. Because the two microphones are at different distances from the sound source, they are receiving the same acoustic event at slightly different times. When combined, this time difference produces comb filtering: certain frequencies cancel each other out and others are reinforced in a way that sounds unnatural and thin. Before you commit to any blend in the mix, you must check phase alignment. The most direct method is to listen to both microphones summed together in mono and compare it to each microphone soloed. If the combined signal sounds thinner and weaker than either microphone alone, the two signals are partially out of phase.
The fix is to delay the closer microphone digitally until the two signals align, or to use the polarity inversion switch on your preamp or DAW channel to flip one signal 180 degrees and check whether that version sounds fuller. Many digital audio workstations include sample-accurate delay plugins that allow precise alignment. A tool like the SoundRadix Auto-Align plugin automates this process and is worth using on any session where you are combining drum microphones. Manual time-alignment by zooming in on the waveforms in your DAW and nudging one region until the transients line up is also effective and requires no additional software.
Preamp and Gain Staging Considerations
Kick drums produce very high sound pressure levels at close range, particularly from inside the shell. The AKG D112 MkII is rated to handle up to 160 dB SPL, and the Shure Beta 52A handles similar levels without distortion because both are passive dynamic microphones that do not require phantom power and are inherently robust at high SPL. If you are using a condenser microphone on the outside position, verify that its maximum SPL rating exceeds what the drum is likely to produce at your chosen distance. A microphone rated to 135 dB SPL will clip on a loud kick drum at 6 inches, which produces an unpleasant crackling distortion that cannot be repaired in the mix.
On the preamp side, keep gain lower than you would for quieter sources. A kick drum at close range does not need much gain to hit a healthy recording level, and excessive gain on a dynamic microphone will amplify the transformer noise of cheaper preamps and add unnecessary noise to the low end of the track. A preamp with a high headroom design, such as the API 512c or the Neve 1073, handles the transient peaks of a kick drum extremely well and contributes a characteristic warmth to the low end that is valued in analogue recording chains. On an audio interface with integrated preamps, the Universal Audio Apollo series and the Focusrite Scarlett series both provide sufficient headroom for kick drum recording at sensible gain settings.
Front Head Damping and Its Effect on Microphone Choice
The resonant head and the batter head both affect what the microphone captures, and their damping significantly shapes the outcome. A kick drum with the front head removed entirely and heavy internal damping, such as a folded blanket touching the batter head, produces a very dry, dead sound with maximum transient definition. This setup favours an inside microphone aimed at the beater because there is very little sustain or room sound to capture, and the low-frequency content is reduced. Many rock and metal drummers use exactly this configuration.
A drum with both heads intact and minimal internal damping produces far more sustain and low-frequency resonance. The outside microphone benefits from this configuration because the resonant head acts as a coupling mechanism for the low frequencies. In this case, the outside position at 6 to 12 inches in front of the resonant head will capture a fuller, more musical low-end response. If you are working with a drum that has both heads and no port hole, you can still mic it from outside; you simply do not have the option of an inside microphone unless the drummer is willing to cut or remove the front head. In many jazz and orchestral contexts this is the appropriate approach and the outside-only capture is entirely sufficient.
Placing the inside microphone directly on-axis with the centre of the beater strike produces a thin, overly harsh result. The centre of the beater strike is the highest-SPL point and picks up the most mechanical click with the least low-end balance. Move the microphone two to four inches off-centre and angle it slightly toward the impact point rather than placing it in the direct path.
Ignoring phase alignment when combining two kick drum microphones destroys low-end weight in the mix. Comb filtering from misaligned signals is one of the most common causes of a kick drum that sounds full in isolation but thin and hollow when played back in a full mix. Always check mono compatibility and use either manual waveform alignment or a dedicated phase correction tool before committing to a blend.
Using too much preamp gain on a dynamic kick drum microphone adds noise and reduces headroom. Dynamic microphones on a kick drum at close range produce sufficient output voltage without heavy gain amplification. Setting the gain so that transient peaks reach around minus 18 dBFS on your recording meter leaves adequate headroom for the loudest hits and keeps the noise floor well below audible levels.
Conclusion
There is no universally correct way to mic a kick drum. The inside position prioritises transient attack and works well in dense, fast-moving arrangements. The outside position captures a fuller, more natural low-end character and suits acoustic or vintage-influenced production. The dual-mic approach gives you both, provided you address phase alignment rigorously. Choose the approach based on the genre, the drum, and the room, not habit.

FREE DOWNLOAD
Stop Guessing. Start Buying Smart.
The specs that actually matter, demystified.
Headphones, microphones, the spec sheet jargon you can ignore — all in one quick-reference PDF. Free, instant, no fluff.
Send Me the CheatsheetYou'll also receive occasional new guide notifications. Unsubscribe anytime. No spam, ever.